Building an E-commerce Chatbot: A Step-by-Step Guide

User satisfaction together with conversion rates depends heavily on customer interaction within an environment where shopping takes place online.

User experience enhancement alongside instant customer support encouraged me to develop a basic yet efficient chatbot system for AniClothe which operates as a custom T-shirt e-commerce platform.

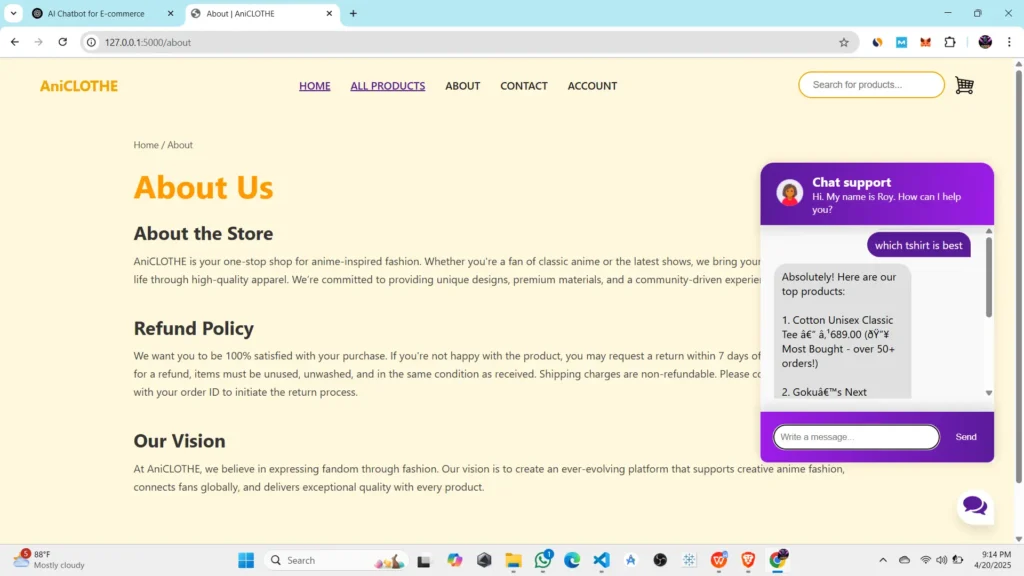
The chatbot responds to user questions while useful customers in finding products and giving basic instructions for shopping.


My article outlines the entire process of developing the chatbot starting from concept phase until it reaches implementation and deployment stages.

Download the chatbot for ecommerce project at the button page.

Step 1: Project Planning and Purpose

The first and most essential step in any project is defining the objective.

Project Goal:
To create a chatbot for AniClothe that:

  • Answers user FAQs like delivery time, return policy, etc.

  • Helps users search T-shirts by category, quote, or anime character.

  • Provides basic navigation help, like “show me all products” or “go to cart”.

  • Improves customer experience without needing human support for every query.

Step 2: Choosing the Technology Stack

Since my platform is built with WordPress and WooCommerce, but I wanted to have more control over the chatbot’s behavior, I decided to create a custom Python-based chatbot using the following stack:

  • Python – Core programming language

  • Flask – For building a web API

  • HTML/CSS/JavaScript – For chatbot UI integration

  • JSON – For managing question-response pairs

  • Chatbot Training File – Simple intent-based structure

  • Optional: SQLite or Firebase – For saving chat history or orders (if extended)


Step 3: Designing the Chatbot Logic

Rather than using an AI/ML model initially, I opted for a rule-based chatbot using intents, which allowed me to define user input categories and corresponding responses.

Example structure: JSON file

				
					{
  "intents": [
    {
      "tag": "greeting",
      "patterns": ["Hi", "Hello", "Hey"],
      "responses": ["Hello! How can I help you today?"]
    },
    {
      "tag": "delivery",
      "patterns": ["How long is delivery?", "Delivery time?", "Shipping duration"],
      "responses": ["Delivery usually takes 4-7 business days."]
    }
  ]
}


Step 4: Creating the Python Chatbot Backend

I used the Natural Language Toolkit (NLTK) to process user input and find the best matching intent.

Key Python Modules Used:

  • json – To read intent file

  • random – To vary responses

  • nltk – For tokenizing and stemming

  • Flask – To create a local API

Example Code:

				
					from flask import Flask, request, jsonify
import nltk, json, random

app = Flask(__name__)

with open('intents.json') as file:
    data = json.load(file)

def get_response(user_input):
    for intent in data['intents']:
        if any(pattern.lower() in user_input.lower() for pattern in intent['patterns']):
            return random.choice(intent['responses'])
    return "Sorry, I didn't understand that."

@app.route('/chat', methods=['POST'])
def chat():
    user_input = request.json['message']
    response = get_response(user_input)
    return jsonify({"reply": response})

if __name__ == '__main__':
    app.run(debug=True)


Step 5: Building the Chatbot Frontend

To embed the chatbot on my AniClothe website, I created a clean HTML/CSS/JavaScript UI.

Key Features of UI:

  • Chatbox toggle button (bottom-right corner)

  • Simple message bubbles

  • Asynchronous API requests to Flask backend

Step 6: Testing the Chatbot

I tested the chatbot using:

  • Local server (Flask on port 5000)

  • Cross-browser compatibility (Chrome, Firefox)

  • Mobile responsiveness

I ran tests for:

  • Greeting interactions

  • FAQ responses (delivery, returns, offers)

  • Unexpected inputs (error handling)

Step 7: Deploying the Chatbot

To make the chatbot available on the live website:

  1. Hosted the Python Flask server using PythonAnywhere (or Render/Heroku).

  2. Updated the frontend fetch URL to point to the hosted API endpoint.

  3. Embedded the HTML/JS code inside the AniClothe WordPress theme using a custom HTML block or child theme integration.


Step 8: Enhancements and Future Plans

After deploying the basic chatbot, I planned several upgrades:

  • Firebase or SQL Integration – To save messages for analytics.

  • Product Recommendation API – Connect the chatbot to WooCommerce database.

  • Voice Input Integration – Add speech-to-text for more interaction.

  • Avatar + Voice Output – Create a talking AI avatar (using tools like MediaPipe or Ready Player Me).

  • Multilingual Support – Allow interaction in Hindi and Bengali for regional users.


Conclusion

Building this chatbot was a rewarding experience. It not only enhanced AniClothe’s user engagement but also helped me apply core development skills in Python, Flask, and web technologies. This project proved how even a basic chatbot can significantly improve the user journey and reduce dependency on human customer support.

If you’re running an e-commerce website and want to automate customer service, I highly recommend building your own custom chatbot instead of relying solely on third-party tools. With just a few weeks of work, you can build something impactful, scalable, and tailored to your brand.

Download the chatbot for ecommerce file: CLICK HERE

LET’S KEEP IN TOUCH!

We’d love to keep you updated with our latest post and work

We don’t spam! Read our Privacy Policy for more info.

Leave a comment